Vagrant is around for quite a time now and people prefer to work on virtual machine running locally for a faster performance. But I personally despise working on a Virtual Box mainly because it is a big pain setting it up for each project and if something screws up do it all over again. Though the performance was really shooting sky when I ran a Drupal project running in a Virtual Box. But Vagrant made my life easier. And with PuPHPet, well it is just a cherry on top.
Vagrant:
Create and configure lightweight, reproducible, and portable development environments. Vagrant will change how you work
Puppet
Puppet is IT automation software that helps system administrators manage infrastructure throughout its life cycle, from provisioning and configuration to orchestration and reporting. Using Puppet, you can easily automate repetitive tasks, quickly deploy critical applications, and proactively manage change, scaling from 10s of servers to 1000s, on-premise or in the cloud.
Well if you are not sure why you should use Vagrant go through this awesome post What is Vagrant and Why Should I care?
About PuPHPet, it is a online GUI configuration tool for Vagrant and Puppet to create virtual machines for web development. It goes ahead and saves time even more by packing all the tools a Drupal developer needs in his machine. Whether its Drush, Apache or Nginx, a variety of databases, etc.
Tools required to run a Drupal project in Vagrant are a virtual machine software like Virtual Box and Vagrant.
Now let’s start by creating our virtual machine with PuPHPet. Go to puphpet.com and proceed by clicking on the big green button below on homepage.
 On the next page select the virtual machine software you are using, Linux distribution operating system, RAM for the system, a shared folder.
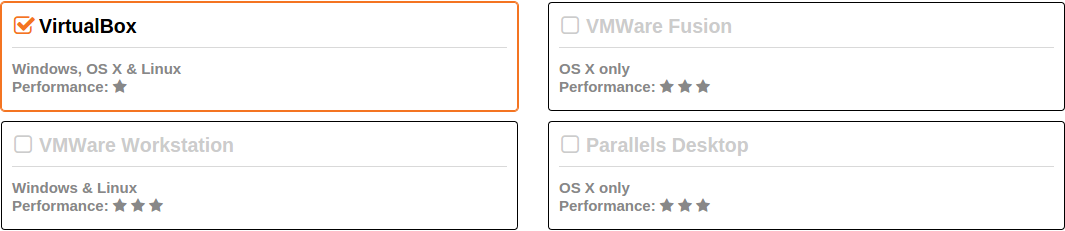
I have Virtual Box installed, so I choose it. If you have other providers you will need to install the Vagrant plugin for it. And it’s paid.

Select the Operating system you want to work on.

Give an IP address for the host machine, a hostname, the amount of memory you want it to have and number of CPUs. Usually 1 gigs of RAM is sufficient but if you have high RAM you can throw in a few more. Same case with the number of CPUs.
The forwarded ports can be kept at default.

Give a name to the Folder Source. This is the folder where you will be putting in all the project files. Though it is not necessary but it is useful for a cleaner folder structure.
The sharing type again depends on your choice but as said in the site the Default sharing is slow so its better to use NFS sharing.
After that is done move on to selecting the system package you want to have. I usually select vim and git to be installed in my server.
![]()
Leave User Groups, Firewall Rules, Cron Jobs and Custom Files as default unless you know what know.
In the server settings select your desired server to work on. You cant select both as there can not be sheath. I choose Apache over Nginx as I am more comfortable with it.
Other than the Virtual host settings, the other configs can be left untouched.

Select your desired name for the virtual host of your server. Name your document root folder which will hold the files and directories of the project.
Proceeding further install PHP of the version you want. It is preferred to work on PHP 5.6

Configure and choose the PHP, Pear, Pecl modules you want to use in your server. Though most of it can be left alone again but it is good to have PHP module gd as it is required by Drupal.

From Libraries section select he libraries you want. Usually I choose to have only Drush installed as I can’t just work without it.

From this we jump to install MySQL for our database.
Select the desired version and choose your database admin user name and password. It is not required to Adminer installed as we can connect to the database using MySQL Workbench (which can be a topic for another blog post). You can also add in a database to hold Drupal.

Next is to give full permission to the database user you created so that you have access the database. Generally it can be left on default.
NB: I have faced error if I keep the same database user for Vagrant boxesSo its better to change the database username for each box.
We are almost done. The next configurations depends on your choice but I leave it on default or blank because those are rarely used depending on situations.
On the final page you will have a big green button which will download your Vagrant box.

Once downloaded you will get a zip file named puphpet.zip. Extract the zip and you will have a folder with a junky name.
Now the beauty of Vagrant is you place this directory anywhere in your system. I have created a folder named “vagrant” in my Documents folder where I place all my Vagrant boxes.
Inside the folder you will have all the configurations you need in a yaml file inside puphpet directory “config.yaml”.
Next step is create a directory named “workspace” as we configured in the initial step in Shared folder settings.
After this go to terminal and navigate to the directory you have placed the Vagrant box and type in vagrant up and grab a cup of coffee while vagrant does it magic.

It will take around 10-20 mins depending on your connection. If you see an ocean of red lines in terminal with a error message in the end then something might have went wrong. But a green garden of lines in the terminal depicts everything went on smooth and good.
Now if you hit the IP you gave for your host you will be greeted with the PuPHPet landing page.
Next thing is to add in the host name in your hosts file to access it. Go to /etc and open up the host file and add in the following line.
192.168.56.101 www.drupal.dev
Next is installing Drupal in the Vagrant box.
Go to the Vagrant folder and inside the workspace directory you can place the Drupal installation files. Otherwise you can also place in the entire folder which can be accessed by the folder name. Just like localhost.
Now go to a browser and hit http://www.drupal.dev and you will get the Drupal installation screen. Note that in the database settings use the db user name and password which you had set while creating the box in PuPHPet.
That’s it. Now you have a Virtual Machine running Drupal in your local system where you can work on. It can be easily opened in any IDE as the Drupal root folder lies in your local file system.
To login into the server just do a vagrant ssh and you will be inside your server from where you can do whatever you want in the server.
Few notes:
- Whenever you are done do a vagrant halt to stop the virtual machine. Have faced a problem where I did not do it and the system got corrupted as it was not shut down properly.
- Next time when you log in to work on it just do a vagrant up which will boot up the machine in less than a minute.
- If your Drupal installation is in sub directory you can edit the host file inside the Vagrant box to point it to the root directory.
- If you want a same environment for all of your team to work on, share the vagrant box within your team and each one will have the identical working environment to work on.
Further documentations can be found on Vagrant Documentation section.
References:
